Adding animated GIFs to your WordPress website can make your content more engaging and help explain your products or services visually.
What’s a GIF file?
GIFs, or graphics interchange format, are a type of image format that create animations by displaying a series of frames and can loop continuously.

This guide will walk you through the process in easy steps, plus tips for performance optimization and troubleshooting.
Step 1: Find Your Perfect Animated GIF Images
Before adding a GIF, decide where to get it. Your choice may depend on whether you need a particular style or simply want to add a fun element to your content. Popular options include downloading from free libraries or creating a custom animation. Knowing what you need makes selecting the method much easier.
Where to find GIFs:
GIPHY – Has thousands of GIFs for every topic
Tenor – Great for reaction GIFs
Custom animations produced with graphic software.
Stock libraries featuring high-quality animated images.
Create your own GIFs
Use these platforms to easily create your own GIFs:
GIPHY Capture (Mac) – Record your screen as a GIF
ScreenToGif (Windows) – Record screen activities as GIFs
Canva – Create animated designs with text and brand elements
Kapwing – Convert videos to GIFs and add text overlays
EZGif – Make GIFs from uploaded images
Personalize them by adding text and emojis, and store them securely to avoid potential issues when using them on websites like WordPress.
Bonus Tips:
Keep your GIF small (under 1MB) to avoid slowing down your website. Smaller is better!
Use CSS instead of GIFs for better performance: Your web designer might be able to use CSS instead of GIFs for simple animations like loading spinners or button effects. Contact me to evaluate if CSS would work better for your animation needs.
Step 2: Upload Your GIF File to WordPress
An easy way to add a GIF is by uploading it through the WordPress Media Library. This method works perfectly if you have the file locally and want to manage it directly within WordPress.
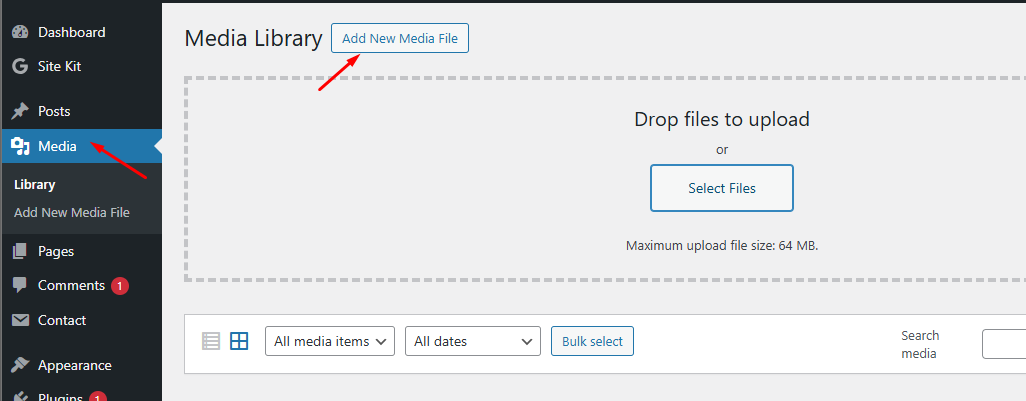
Log in to your WordPress dashboard
Click on Media in the left menu
Click Add New
Either drag your GIF file into the upload area or click “Select Files”
Wait for the upload to complete
Important Tips:
Keep an eye on the file size because large GIFs can slow down your site.
Use descriptive filenames and alt text to help boost SEO and improve accessibility.
Step 3: Add GIFs (in Full Size) to a Page or Post
Once you’ve uploaded your GIF, the next step is adding it to your content. WordPress offers several ways to embed images, and GIFs are no different from other media types.
If you are using the Block Editor (most common):
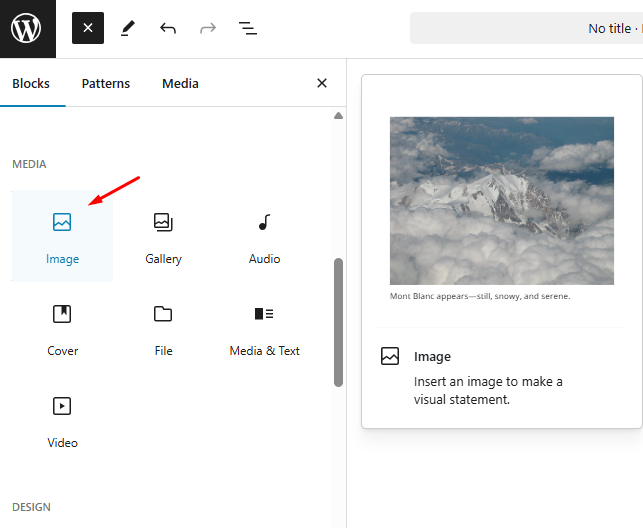
Edit the page or post where you want to add the GIF
Click the “+” button to add a new block
Select “Image” block
Click “Media Library”
Find and select your GIF
Click “Select”
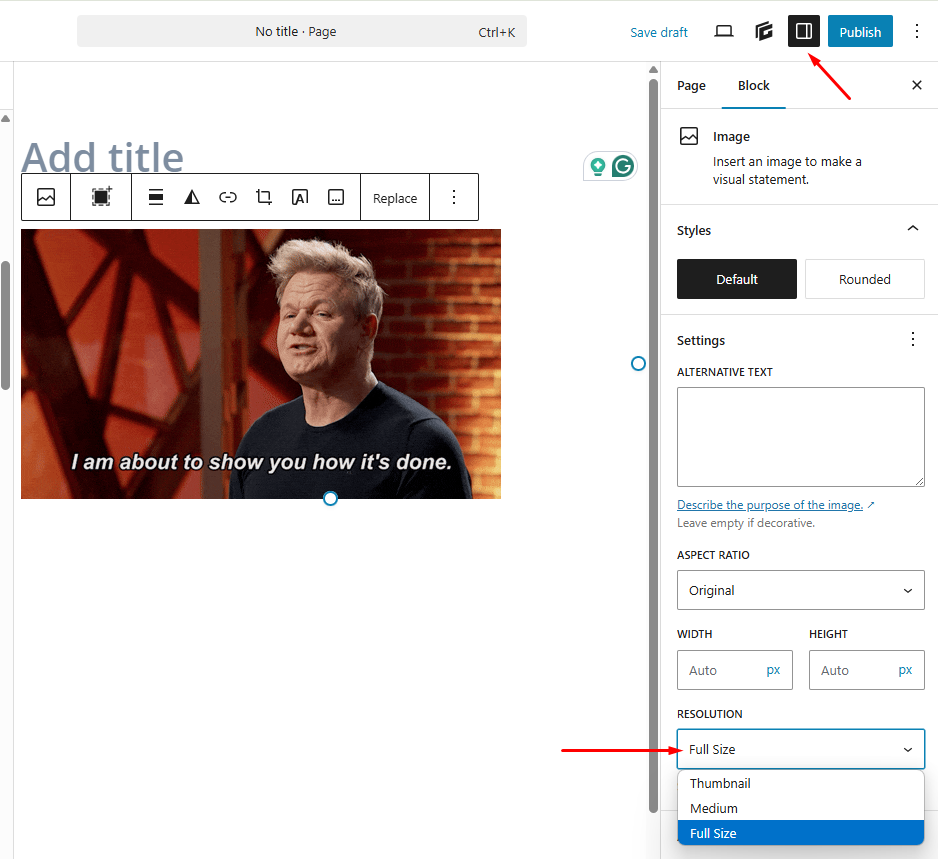
Important: Make sure to choose “Full Size” from the size options on the right side panel to ensure the GIF’s animation is preserved rather than displayed as a static image.
If you are using the Classic Editor:
Edit your page or post
Click “Add Media” above the editor
Select your GIF from the media library
Click “Insert into post”
Important: Select “Full Size” in the attachment display settings.
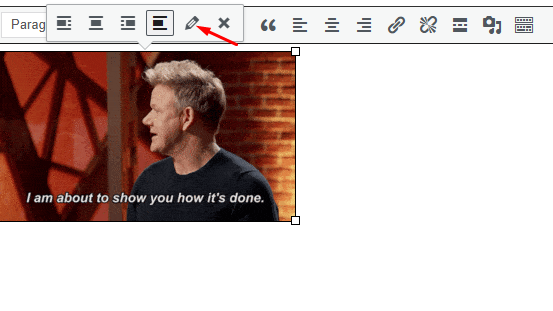
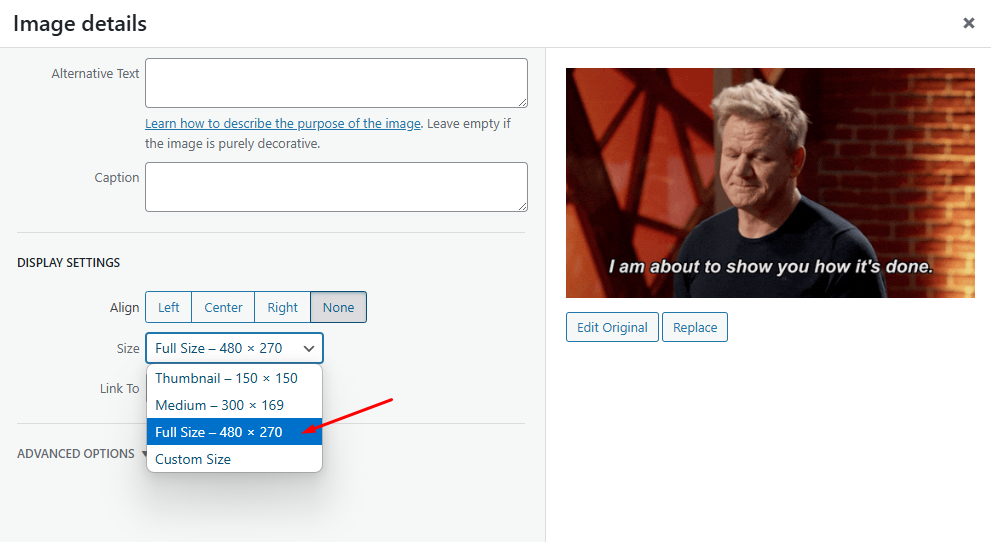
This method works well for most users. If you are using a page builder or a custom theme, the options might vary slightly. In any case, checking the preview helps ensure that the GIF appears correctly before your site goes live.
Important Tips:
If your GIF isn’t animating: Always select “Full Size” when inserting. WordPress automatically creates smaller versions of your images, but these smaller versions won’t animate.
Step 4: Optimize Your GIF for Performance
Since GIF files can be quite large, optimizing them is really important to keep your site fast. Before you finalize your content, consider a few strategies to make sure your GIFs run smoothly.
Ways to Optimize:
Limit the number of GIFs on a single page (1-2 is usually best)
Place your most important GIF near the top of the page
Use a tool like Google PageSpeed Insights (free tool) to check if your page is loading quickly
Compress your GIF using online tools like EZGif before uploading it.
Reduce the number of frames if possible, as fewer frames lead to smaller file sizes.
Convert lengthy animations to a video format for better compression and quality.
Use a plugin that supports lazy loading to ensure media only loads when needed.
Why This Is Important:
Faster page loading improves user experience.
Good performance helps maintain strong SEO rankings.
Lower file sizes reduce server load and bandwidth usage.
Spending a little extra time to optimize your GIFs can make a big difference in your site’s responsiveness and overall performance.
Step 5: Preview and Publish
Click “Preview” to make sure your GIF is working properly
Check how it looks on mobile devices (most of your visitors probably use phones)
Make sure the GIF enhances your message rather than distracting from it
When everything looks good, click “Update” or “Publish”
Common Issues & Quick Fixes
1. If Your GIF Does Not Display:
Clear your browser’s cache to ensure you are viewing the latest version.
Double-check that the file is actually a .gif and that it isn’t corrupted.
Temporarily disable caching plugins to see if they are causing the issue.
2. If the GIF Does Not Loop:
Verify that the original GIF is set to loop using an online GIF editor or image tool.
Consider using a plugin with advanced media settings to adjust playback options.
3. If the GIF Appears Pixelated or Low Quality:
Check the source file; a higher resolution GIF maintains clarity even after compression.
Try an alternative compression method or use a professional service if necessary.
4. If your GIF Animation appears as a static image:
Double-check that you selected “Full Size” when inserting. GIFs may upload as static images due to WordPress automatically generating image sizes, which only captures the first frame of the animation.
Try clearing your browser cache (press Ctrl+F5 or Cmd+Shift+R)
5. If your GIF loads slowly:
Compress it using EZGif
Make it physically smaller on the page
Consider using fewer GIFs on the page
These troubleshooting steps can help you fix common issues related to file compatibility or performance settings, leading to a smoother user experience.
Advanced Techniques and Customization Options
If you want more control over how your GIFs appear, there are advanced methods available. These options, which may require additional plugins or some basic coding, offer greater flexibility and creativity.
Using Shortcodes and Plugins:
Some plugins let you control GIF playback, including starting, stopping, and delay settings.
Use shortcodes to manage the placement and behavior of your GIFs on a page.
Integrate with third-party APIs (like Giphy’s) to automatically include trending GIFs in your content.
Custom Styling With CSS:
Apply custom CSS to create hover effects that control GIF playback.
Adjust margins and borders with CSS to better integrate the GIF into your design.
Write media queries to ensure the GIF displays properly on all screen sizes.
While these advanced techniques require extra effort, they make it possible to perfectly align your GIF usage with your site’s design and create a truly engaging visual experience for your visitors.
Final Thoughts and Next Steps
Adding GIFs to WordPress can be a straightforward task when broken down into clear steps. I’ve covered selecting your GIF source, uploading the file, inserting it into your content, optimizing performance, and troubleshooting common issues. With some experimentation, you can choose the method that best fits your website’s style and needs.
Your Action Plan:
Pick a GIF that fits your content or create a custom one.
Upload your GIF using the WordPress Media Library, ensuring it meets size and quality standards.
Embed the GIF into your post or page using your preferred editor.
Review and adjust settings to optimize performance and loading speeds.
Test the GIF on different devices to verify proper playback.
Using animated content can take your WordPress site to the next level by making it more engaging and visually appealing. A thoughtful approach to adding and optimizing GIFs helps maintain a fast, attractive site. Over time, trying advanced techniques may reveal new ways to incorporate animated visuals, keeping your content dynamic and fresh.
Real-World Examples
For Product Pages:
Show how your product works in a short loop
Ideal size: About 600px wide, 5-10 seconds long
Place next to your “Buy Now” button
Using GIFs on WordPress sites can enhance user engagement and showcase product features effectively.
For Tutorials:
Show a specific action or step
Keep it focused on one action at a time
Ideal size: About 400px wide, 2-3 seconds long
Adding GIFs to a WordPress post can help illustrate steps clearly and make tutorials more engaging.
For Blog Posts:
Use reaction GIFs to add personality
Ideal size: About 300px wide, very short (1-2 seconds)
Place between paragraphs to break up text
Incorporating WordPress GIFs can enhance the content and keep readers entertained.
Need Help?
Two ways to get support:
Contact me directly – Need professional custom advice? Visit our Contact Us page and I’ll help you add the perfect GIFs to your WordPress site.
Join a community—For ongoing WordPress support, consider joining the Wealthy Affiliate Community, where thousands of entrepreneurs can answer your website questions.
Don’t struggle alone with your WordPress site. Contact us today, and let’s make your website stand out with engaging animations!