A Complete, Step-by-Step Guide for Small Business Owners Who Want a User-Friendly Website
Imagine this. A potential customer visits your website. They’re interested in what you offer but can’t find your pricing section, your contact form, or the answers to their questions.
What happens next?
Chances are, they leave.
Not because your offer wasn’t good—but because your website didn’t make it easy for them to find the info they needed.
That’s where anchor links come in.
Anchor links are simple shortcuts that help people jump directly to specific sections of your page—no endless scrolling, no frustration.
In this guide, I’ll show you exactly how to easily create anchor links in WordPress—step by step, with zero coding experience required. Plus, I’ll explain how anchor links can help make your site easier to navigate and improve the experience for your visitors.
What You’ll Learn in This Guide
✅ How to add anchor links in WordPress—both Block and Classic Editors
✅ The easiest no-code options with plugins
✅ Where and why to use anchor links on your business website
✅ Simple troubleshooting tips
✅ Answers to common questions
Method 1: Adding Anchor Links with the WordPress Block Editor (Gutenberg)
The Block Editor is the default editor in WordPress. Whether you’re working on a page or a post, you can easily add anchor links in just a few clicks.
Step 1: Set the Anchor Destination
This is the section you want people to jump to when they click the link.
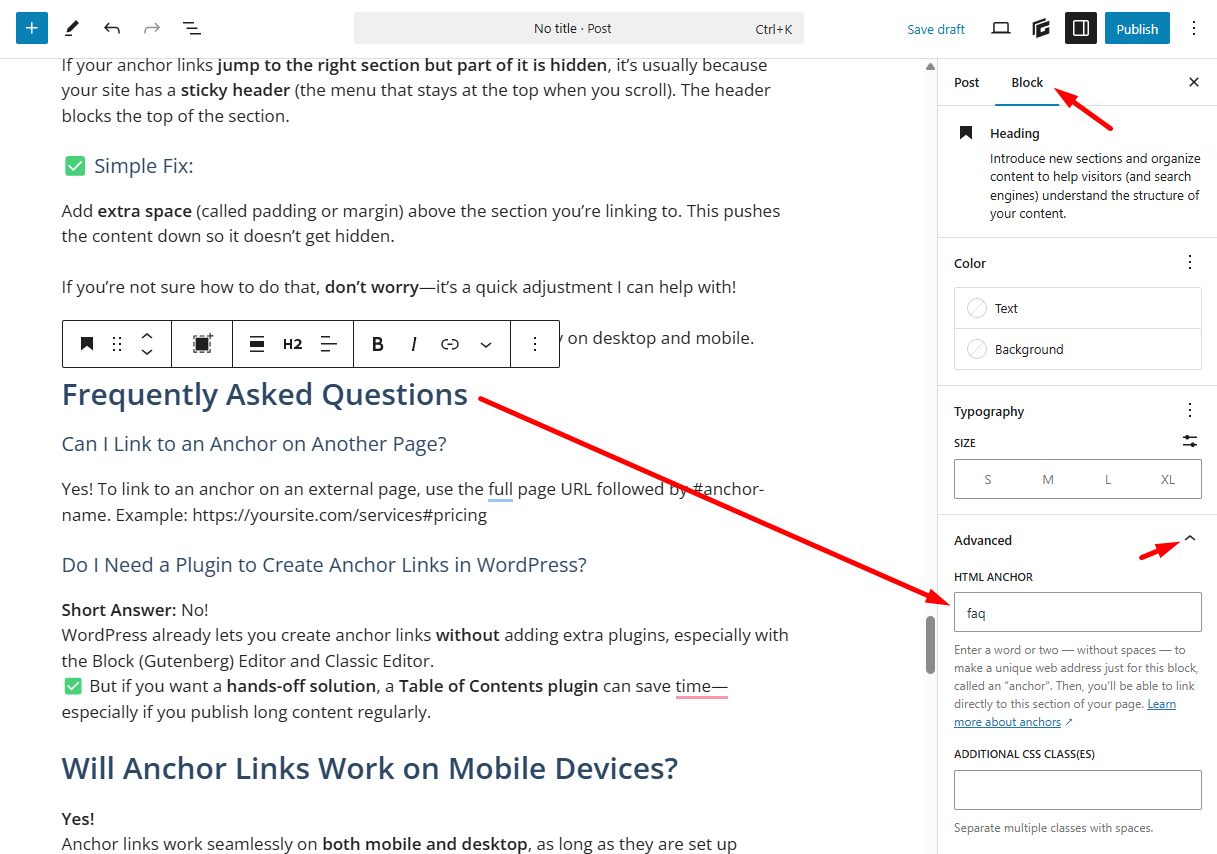
Click on the block you want to link to—usually a heading, like “Pricing,” “Services,” or “FAQs.”
On the right-hand side of your screen, open the Block Settings panel.
Scroll down and click Advanced to expand it.
Look for the field labelled HTML Anchor.
Type a simple, lowercase name (no spaces or special characters). Example: faq or contact
Pro Tip:
If your anchor name needs to include multiple words, use hyphens (dashes) instead of spaces.
For example: use frequently-asked-questions instead of frequently asked questions.
This keeps your anchor valid and ensures your jump link will work correctly.
Step 2: Create the Clickable Link
Now it’s time to add the link that people will click to jump to the section you just set.
Highlight the text you want to turn into a link. Example: “Answers to common questions”
Click the Insert Link button in the toolbar (the chain link icon).
In the link field, type # followed by the anchor name you set in Step 1. Example: #faq
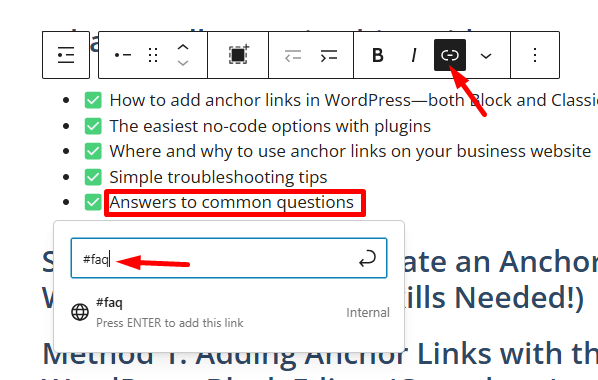
Click Enter to Apply, then Save/Update your page.
Finally, test the link: Click it in preview mode to make sure it jumps to the correct section.
Pro Tip:
If your site has a sticky header (one that stays fixed at the top), the anchor link might jump to the section, but part of it could be hidden behind the header. If that happens, you may need to add some extra space (padding) above your section or use a plugin for smooth scrolling with offset.
That’s it! You’ve successfully added an anchor link using the Block Editor.
👉 Want me to handle it for you? Contact me here and I’ll make sure your navigation works smoothly across all devices!
Method 2: Adding Anchor Links in the Classic Editor
Still using the Classic Editor in the WordPress editor? No worries—it’s just as easy to create anchor links here, and you won’t need to touch any code.
Follow these simple steps to set up anchor links and help your visitors quickly navigate your content.
Step 1: Set the Anchor Destination (Classic Editor)
In the Classic Editor, you’ll need to add an HTML anchor manually—but don’t worry, I’ll show you the easiest way to do this without needing advanced coding skills.
Option 1: Use a Plugin That Adds Anchor Functionality
The simplest option for non-tech users is to use a plugin that lets you add anchor links visually, without editing code.
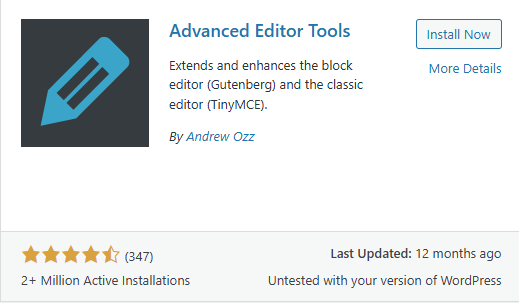
Recommended Plugin: Advanced Editor Tools
This plugin enhances the Classic Editor toolbar and gives you an easy way to insert anchors.
How to Do It with TinyMCE Advanced:
Install and activate Advanced Editor Tools (TinyMCE Advanced) from the Plugins menu.
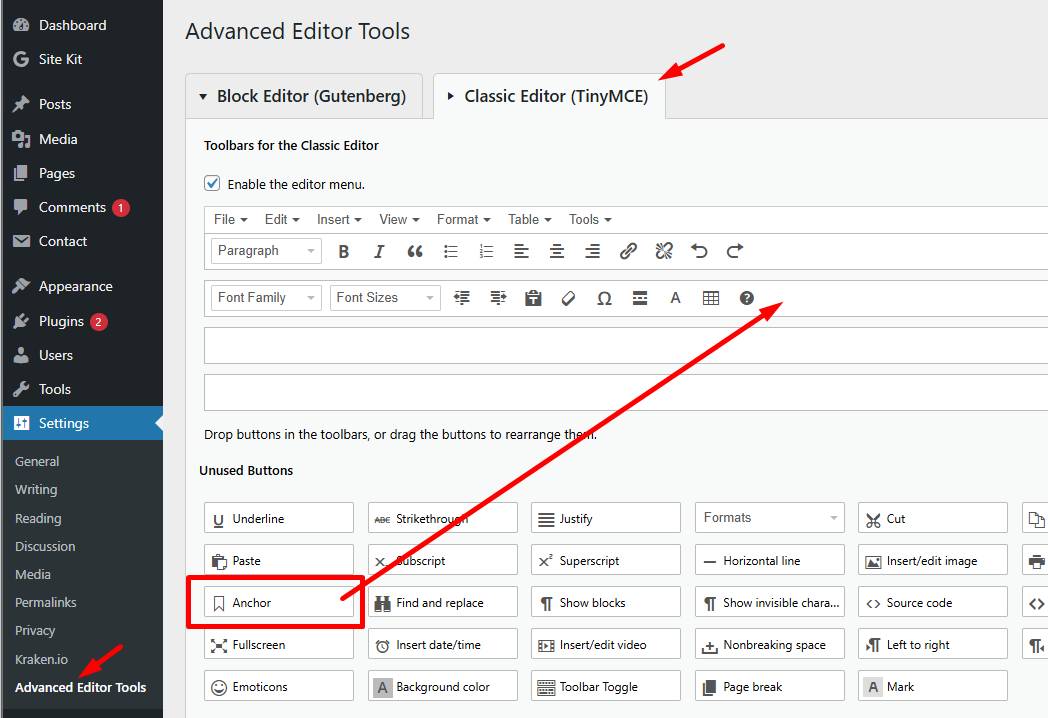
Go to Settings > Advanced Editor Tools.
Enable the anchor button in the toolbar (you may need to drag it into the editor toolbar layout).
Press “Save Changes”
- In the classic editor, place your cursor where you want the anchor (e.g., above your “Frequently Asked Questions” heading).
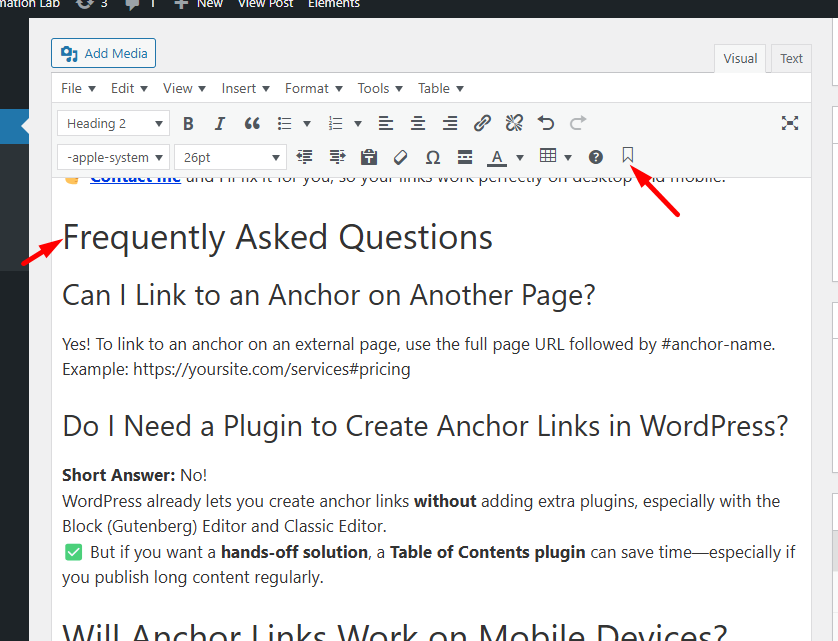
- Click the anchor icon in the toolbar
- Enter a short, simple anchor name (e.g., faq).
- Click OK
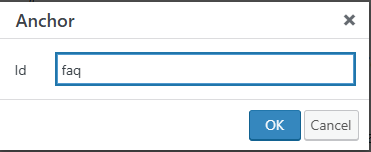
- Click OK—you’ll now see a small anchor icon inserted into the editor
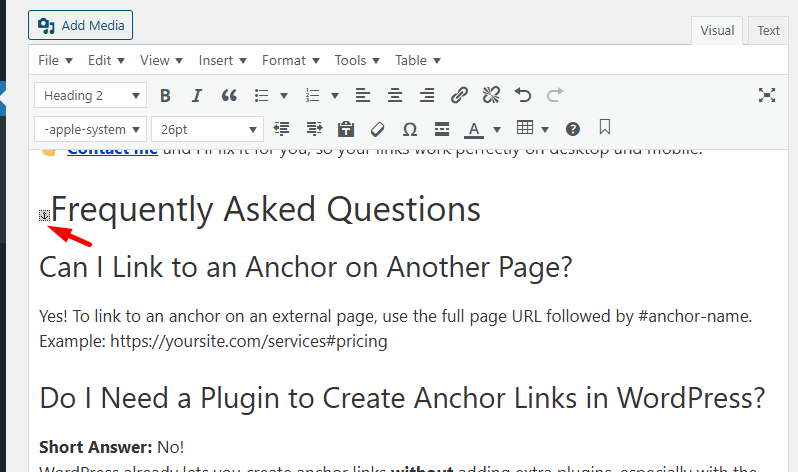
- This anchor is the destination your link will jump to in Step 2: Create the Clickable Link.
Pro Tip:
If you want to use more than one word in your anchor name, use dashes instead of spaces.
For example: use frequently-asked-questions instead of frequently asked questions.
This ensures the anchor link works correctly—spaces can break the link.
Option 2 (Advanced Users Only): Manually Add an ID in HTML View
If you’re comfortable switching to Text view in the Classic Editor:
Locate your heading, e.g.:
<h2>Frequently Asked Questions</h2>Add an ID manually:
<h2 id="faq">Frequently Asked Questions</h2>⚠️ Use this only if you’re confident with code—otherwise, stick with the plugin method above.
Step 2: Create the Clickable Link
Now that you’ve created the anchor destination, it’s time to create the link that jumps to it.
Highlight the text you want to turn into a clickable link. Example: “See Frequently Asked Questions” or “Jump to Pricing Plans.”
Click the Insert/Edit Link button (the chain icon in the toolbar).
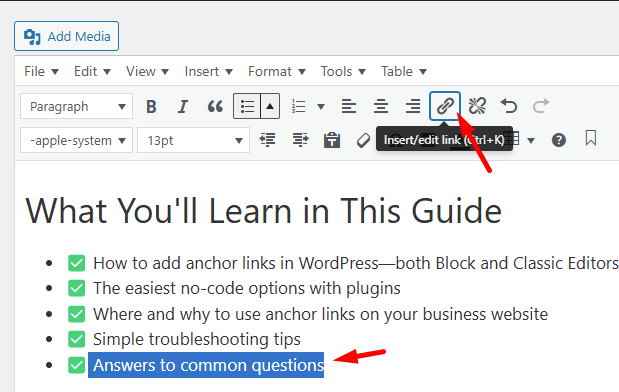
In the URL field, type # followed by the heading ID. Example: #faq
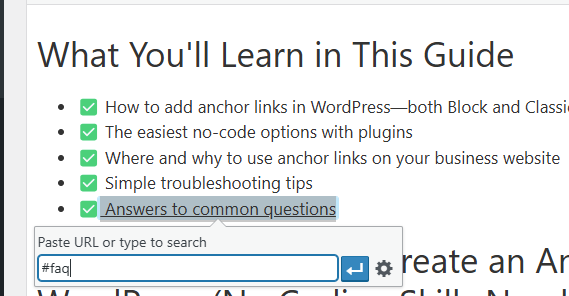
Click Apply, or press Enter
Then Save/Update your page.
Once it’s saved, preview your page and click the link to make sure it jumps to the correct section.
Method 3: Use a Plugin (The Easiest Way!)
If you’re managing a long page—like a detailed service page, FAQ, or guide—manually creating anchor links can take time. A Table of Contents (TOC) plugin makes it simple by automatically adding anchor links to your page headings and displaying them in a clickable list. This way, you can automatically add anchor links to improve navigation and user experience.
With just a few clicks, your visitors can jump straight to the section they’re interested in—no scrolling required.
Why Use a TOC Plugin?
✅ Makes it easier for visitors to find what they need
✅ Adds a professional, clean navigation to your content
✅ Saves time—no need to create links manually
✅ Encourages visitors to stay longer and explore
✅ Can improve SEO by making your content easier for Google to understand
Step-by-Step: How to Add a Table of Contents Plugin in WordPress
You don’t need any coding or design skills—just follow these easy steps.
Step 1: Install the Plugin
In your WordPress dashboard, go to Plugins > Add New
Search for Easy Table of Contents (or another recommended plugin below)
Click Install Now, then Activate
✅ Recommended Plugins:
Easy Table of Contents (great for beginners)
Table of Contents Plus (more customization options)

Step 2: Configure the Plugin
After activation, go to the plugin’s Settings (under Settings > Table of Contents).
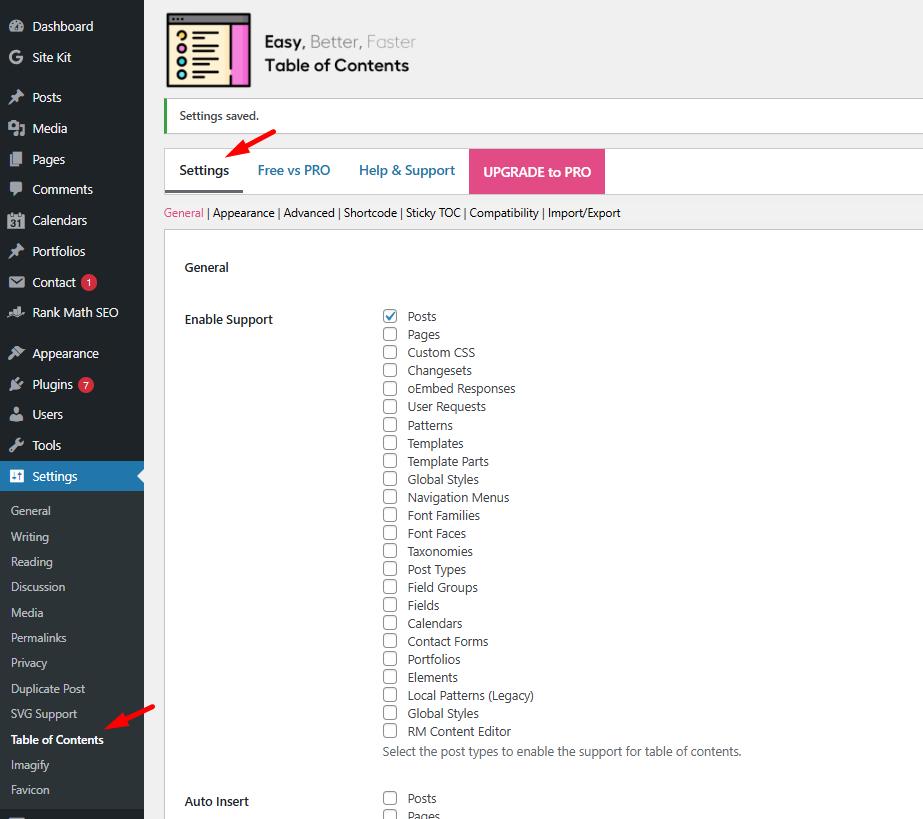
Here’s what you can do:
✔️ Decide where the table appears (top of the page, before headings, etc.)
✔️ Choose which headings to include (like H2 and H3)
✔️ Customize fonts, colors, and borders to match your website
✔️ Rename the table title (like “Quick Navigation” or “Jump to Section”)
✔️ Enable smooth scrolling for a better user experience
Step 3: Automatically Add the Table of Contents to Your Pages
Once the settings are saved, the plugin will:
✅ Scans your web pages for headings
✅ Creates anchor links automatically
✅ Displays a clickable table of contents for your visitors
The table updates itself every time you add or change headings—no need to touch anything else!
What Visitors See
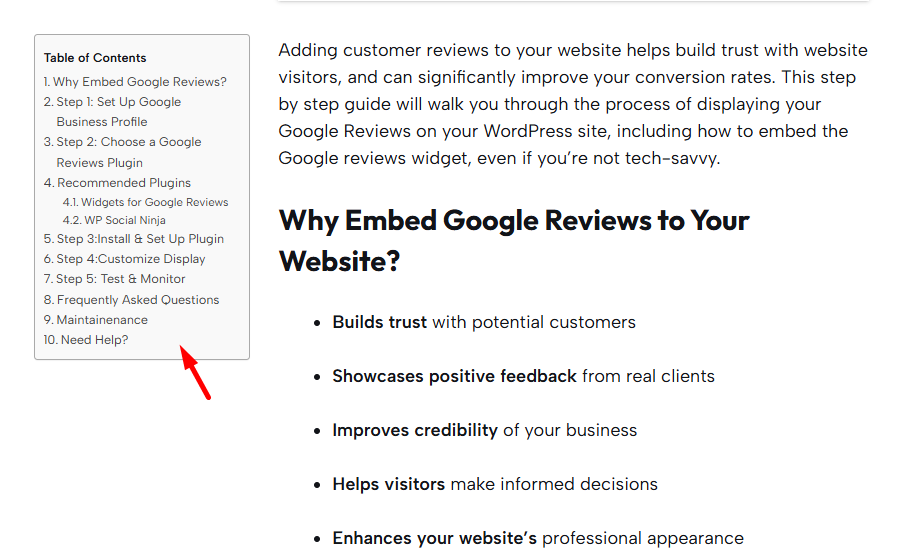
Your visitors will see a clickable list like this (usually at the top of the page):
📝 Table of Contents
Jump to Services
See Pricing Plans
Read Testimonials
Contact Us
When they click a link, they’ll jump straight to that section.
Why Anchor Links Matter for Your Business
Anchor links do more than just make navigation easier. They:
✅ Save your customers time, reducing frustration
✅ Encourage visitors to stay longer, increasing engagement
✅ Make your site look professional and organized
✅ Improve accessibility for all users
✅ Can boost your SEO by making your content easier to crawl and understand
Troubleshooting Anchor Links: What to Do When Things Don’t Work
Anchor links are simple in theory, but in real life, a few things can trip you up—especially if you’re new to WordPress or using a theme with advanced layouts.
Here are the most common issues business owners run into, and how to fix them (or when to ask for help).
Problem #1: The Link Doesn’t Work at All
You click your anchor link… and nothing happens. 😩
What to Check:
Does the anchor name match exactly?
The name you set (like pricing) must match the link exactly: #pricing. Even one small typo will break it.Did you use spaces or special characters?
Stick to lowercase letters and use hyphens for multiple words (e.g., #our-services).Is the anchor added to the correct section?
In the Block Editor, make sure the anchor is in the right sidebar > Advanced settings.
In the Classic Editor, ensure the anchor is placed using a plugin or added in HTML.Is the plugin activated?
If you’re using a plugin to insert anchors (like Easy Table of Contents), make sure it’s installed, activated, and set up correctly.Still unsure?
👉 Contact me and I’ll help troubleshoot it for you.
Problem #2: The Link Jumps—But Not to the Right Spot
This happens when the link scrolls the page, but your heading is partially hidden behind your sticky menu.
Why It Happens?
Your website might have a sticky header (a menu that stays at the top of the screen). When you jump to a section, it scrolls to the right place—but the header covers it up.
How to Fix It:
Add some extra space (padding or margin) above the section so it’s not hidden.
Some plugins or themes have built-in “scroll offset” settings—check your theme settings or plugin options.
🙋 Not sure how to do this? I can fix it in minutes.
👉 Click here to get help
Bonus Tip: Avoid Using the Same Anchor Twice on One Page
Each anchor name (like #contact) should be unique on a page. If you accidentally use the same anchor more than once, your link may jump to the wrong section—or not work at all.
✔️ Keep anchor names short, clear, and unique.
Example: #contact-form and #contact-section are better than using #contact twice.
Frequently Asked Questions
1. Can I link to a section on another page (not just the same page)?
Yes, you can!
If you want to link to a specific section on another page of your website, just use the full URL followed by #anchor-name.
Example:
https://yourwebsite.com/services#pricing
This is great for linking from your homepage to a specific section on your services or FAQ page.
2. Do I need a plugin to create anchor links?
Not always.
If you’re using the Block Editor (Gutenberg) or the Classic Editor with a plugin like Advanced Editor Tools, you can create anchor links without needing anything extra.
✅ But if you publish long content (like FAQs or blog posts), a Table of Contents plugin can automatically create anchor links for you and display them in a clean, clickable list—saving you time.
3. Will Anchor Links Work on Mobile Devices?
Yes—if they’re set up correctly.
Anchor links work just as well on phones and tablets as they do on desktop.
💡 Pro tip:
Sometimes mobile headers (like sticky menus) can cover up the anchor section. Always test your links on your phone to make sure everything looks and scrolls correctly.
4. Will anchor links help my SEO?
Yes, they can.
Anchor links help you:
Organize your content clearly
Improve navigation and reduce bounce rates
Make your site easier for Google to understand
Possibly get featured in “jump-to” links in search results
They also create a better user experience—which search engines love.
5. Can anchor links help with long pages?
Absolutely!
Anchor links are like shortcuts for long pages.
Instead of making your visitor scroll endlessly, they can click a link and jump straight to what they want—whether it’s pricing, contact info, or testimonials.
This makes your site feel more professional and user-friendly.
6. Can I use anchor links on buttons or images, not just text?
Yes!
You can turn almost any clickable element into an anchor link:
A button (“See Pricing” ➡️ #pricing)
An image (like a banner that jumps to your contact form)
This is a great way to guide users through your content—especially for calls to action.
7. Will anchor links break if I redesign my website or change themes?
They might, depending on what changes.
If you:
Rename headings
Reorganize sections
Change themes or switch page builders
…it’s a good idea to test all your anchor links afterward. Some links may need to be updated.
🛠 Want peace of mind? I can help do a quick navigation check-up after your redesign.
8. Can I make anchor links scroll smoothly instead of jumping abruptly?
Yes!
By default, anchor links scroll instantly to the section. But with a small tweak or plugin, you can make them scroll smoothly for a more polished experience.
I can help you add this—it’s a small touch that makes your site feel more modern and professional.
9. Can I add anchor links to my site’s menu?
Yes—especially useful for one-page websites!
You can add anchor links to your WordPress menu, like:
About
Services
Contact
So when someone clicks “Contact” in your menu, it jumps straight to your contact form—on the same page.
10. Will anchor links slow down my website?
Not at all.
Anchor links are lightweight and built into basic HTML.
They won’t affect your site speed—in fact, they can make your site feel faster by helping users find what they need faster.
Not sure how to set all this up? Let Me Handle the Tech Stuff for You
If you’d rather not wrestle with WordPress settings, plugins, or anchor links—I’ve got you.
As a business owner, your time is better spent doing what you do best. I can help by:
✅ Setting up clean, user-friendly anchor links across your site
✅ Making sure navigation feels smooth on both desktop and mobile
✅ Troubleshooting sticky headers, broken links, or scroll issues
✅ Saving you hours of trial-and-error so you can focus on growing your business
👉 Reach out here and I’ll take care of the details, so everything just works.
Want to Learn and DIY at Your Own Pace?
If you’d prefer to explore more on your own (with step-by-step guidance), the Wealthy Affiliate Community is a great place to start.
Inside, you’ll find:
✅ Beginner-friendly WordPress training
✅ Practical SEO tips to help you grow online
✅ A supportive network of entrepreneurs just like you
👉 Join Wealthy Affiliate here and start learning at your own pace.