Why Add Google Calendar to Your Website?
Adding your Google Calendar to your WordPress website creates a more dynamic and interactive experience for your visitors. This integration offers several important benefits for your business:
Streamlined scheduling – Customers can see your availability without calling or emailing
Automatic updates – When you update your Google Calendar, your website reflects those changes instantly
Professional appearance – A well-integrated calendar shows you’re organized and tech-savvy
Time savings – Reduce back-and-forth communications about your schedule
Finding website management overwhelming? Contact me to handle your calendar integration quickly and professionally while you focus on running your business.
Step-By-Step Guide: Integrate Google Calendar in WordPress
Step 1: Prepare Your Google Calendar
1. Create or Select Your Business Calendar
Open Google Calendar in your browser
In the left sidebar, click the “+” next to “Other calendars”

Select “Create new calendar”
Enter a name that reflects your business (e.g., “Main Street Bakery Hours” or “Yoga Class Schedule”)
Add a description if desired
Select your time zone (important for accurate scheduling)
Click “Create calendar”
2. Make Your Calendar Public
In the left sidebar, find your business calendar
Click the three dots next to the calendar name
Select “Settings and sharing”

Scroll to “Access permissions”
Check the box for “Make available to public”

In the dropdown menu, choose what details you want visible:
“See all event details” (most useful for customers)
“See only free/busy” (for just showing availability)
Click “Save”
3. Get Your Calendar Embed Code
While still in calendar settings, scroll to “Integrate calendar”
Find the “Embed code” section

Customize display options if desired:
Click “Customise” button to change view settings
Adjust width and height to fit your website design
Copy the entire code snippet (it starts with < iframe>)

Step 2: Add Your Google Calendar to WordPress Website
Method 1: Using the Built-in WordPress Editor (No Plugins Needed)
1. Access Your WordPress Page
Log in to your WordPress dashboard (yourwebsite.com/wp-admin)
Navigate to the page where you want to display your calendar
Click “Edit page”
2. Insert Your Calendar
If using the block editor (Gutenberg):
Click the “+” icon to add a new block
Search for “Custom HTML” and select it
Paste your Google Calendar embed code into this block

If using the classic editor:
Click the “Text” tab (not “Visual”)
Paste your embed code where you want the calendar to appear
3. Preview and Publish
Click “Preview” to ensure your calendar displays correctly

Check on both desktop and mobile devices if possible

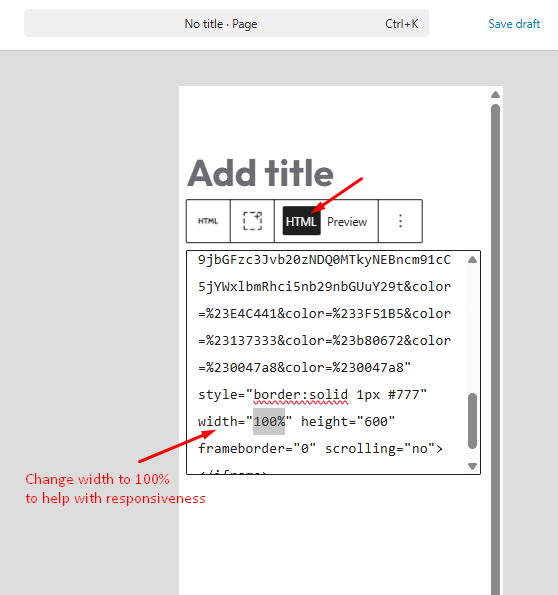
Adjust width settings if needed (in “HTML”, change width to 100% helps with responsiveness)
Click “Update” or “Publish” to make your calendar live
Example: Google Calendar Embed Code – Before & After Width Adjustment
In the image below, you can see how changing the width of the embedded Google Calendar impacts its display:
✅ Before: The width is set to 800. This causes horizontal scrolling and doesn’t adapt well on smaller screens.
✅ After: The width is set to 100%. The calendar adjusts automatically to fit the screen size, making it mobile-friendly.

Method 2: Using a Plugin (Recommended for Non-Technical Users)

1. Install Simple Calendar Plugin
From your WordPress dashboard, go to “Plugins” > “Add New”
Search for “Simple Calendar”
Click “Install Now” next to Simple Calendar (Google Calendar Events)
Click “Activate” after the installation completes
2. Create a New Calendar in WordPress
In your dashboard, find “Calendars” and click “Add New”
Give your calendar a title (e.g., “Store Hours Calendar”)
Under “Calendar Type,” select “Google Calendar”

In Google Calendar Settings, paste your Calendar ID (found in Google Calendar settings under “Integrate calendar” > “Calendar ID”)

Click the Customize button to configure your display settings directly on Google:
Choose your preferred view (month, week, list)
Adjust sizing options as needed
- (Optional) Customize your calendar colours:
In Calendar Settings, open the Appearance tab.
Here, you can modify the colour for Today, Days with Events, and more.

Click “Publish” to save your calendar.
3. Set Up Google API Key (Required to Display Public Events)
Follow these instructions to create and save your Google API Key so your public Google Calendar events can display properly on your WordPress site.
1. Open Google Developers Console
Visit the Google Developers Console.
2. Select or Create a New Project
Click the “Select a Project” dropdown at the top.
In the popup window, click “New Project.”
Give your project a name (e.g., “Studio WY”) and click Create

3. Enable the Google Calendar API
Once your project is created, you’ll be redirected to the Dashboard.
Click “Enable APIs and Services.”
In the API Library, search for “Google Calendar API.”
Click on it, then click the “Enable” button.


4. Create API Credentials
On the left menu, click Credentials under API & Services.
Click Create Credentials at the top.
From the dropdown, select API Key.
5. Copy Your API Key
A popup window will display your new API Key.
Click Copy (Cmd-C or Ctrl-C) to save it to your clipboard

6. Paste API Key into WordPress
In your WordPress dashboard, go to Calendars > Settings.
Find the field labeled Google API Key.
Paste your API Key into the field, making sure there are no extra spaces.
Click Save Changes.

Pro Tips: Restrict Your API Key (Highly Recommended)
If you don’t restrict your Google API Key, anyone who finds it can use it on their own website or app, running up your usage limits and potentially costing you money if quotas are exceeded.
To prevent unauthorized use of your API Key, you should restrict it. Here’s how:
In Google Developers Console, go to Credentials.
Click the 3 Dots > Edit icon (pencil) next to your API Key.
Under API restrictions, select Restrict Key.
Choose Google Calendar API from the list.
Under Application restrictions, you can also restrict by “Websites“
Under Website restrictions, restrict by your domain name (eg: https://studiowy.com)

Restrict by API
Scroll down to API restrictions and select “Restrict key”
- In the dropdown, choose “Google Calendar API”. This ensures the key can only access the Google Calendar API, blocking other services.

Click Save to apply restrictions.
4. Add Your Calendar to a Page
Copy the shortcode displayed in the calendar editor (looks like [calendar id=”44403”])

Go to the page where you want to display your calendar
Paste the shortcode within your page content

Update or publish your page
TIPS:
If your calendar shows no events, it’s usually because the Google API Key is missing or incorrect.
Make sure your Google Calendar is set to public under Access permissions.
Confirm you have added events to the specific calendar you are trying to display.
Expert Tip:
If your primary goal is to let customers book appointments (rather than just view your schedule), consider using dedicated scheduling tools like Calendly or Acuity Scheduling.
These tools specialize in automating bookings, sending reminders, and integrating with your calendar—without the need for a WordPress plugin. They’re powerful tool often easier for clients to use and faster to set up, especially for service-based businesses.
Troubleshooting Common Issues
Even with the right plugin or embed method, things don’t always go smoothly. Below are the most common problems, why they happen, and how to fix them.
1. Calendar Not Displaying
Make Sure It’s Public: Ensure your Google Calendar is set to “Make available to public”. If it’s private, it won’t show on your website.
Verify the correct calendar: Confirm you’re embedding the intended calendar
Check for plugin conflicts: Temporarily deactivate other plugins to identify conflicts
2. Calendar Looks Wrong or Broken
Width problems: Set width to 100% for better responsive behaviour
Height issues: Increase height if events appear cut off
Style conflicts: Try placing the calendar in a different section or container
3. Events Not Showing Up
Private Events Don’t Show: Only public events appear on your website. Make sure the events aren’t marked private in Google Calendar.
Time zone issues: Verify your Google Calendar and WordPress site use the same time zone. In WordPress: Settings > General > Timezone.
Cache problems: If you updated your calendar but don’t see changes, clear your website cache (or browser cache). If you use services like Cloudflare, clear that too.
Frequently Asked Questions
Q: Can my website visitors book appointments directly on my calendar?
No, the standard embedded Google Calendar is view-only. If you want customers to book appointments, you’ll need to:
Use a WordPress booking plugin like Amelia (paid) or Simply Schedule Appointments (free/paid).
Or use external tools like Calendly or Acuity Scheduling, which handle online booking, reminders, and sync with your Google Calendar.
👉 Best for service businesses like salons, coaches, consultants, and clinics.
Q. Will website visitors be able to modify or delete my events?
No, visitors can only view events on your embedded calendar. Only people you give edit access to in Google Calendar can make changes.
Q. How do I show only the specific events that I want my customers to see?
Create a separate business calendar in Google Calendar for public events (like appointments, classes, or openings).
Keep personal/private events on a different calendar, or mark them as Private if they’re on the same calendar.
👉 This keeps your personal schedule separate from your business events.
Q: Can I display multiple calendars at the same time?
Yes!
You can combine multiple calendars in Google Calendar and embed them as a group calendar, or
Embed separate calendars in different sections of your website.
👉 For example, one calendar for “Workshops” and another for “Private Consultations.”
Q: Will adding a calendar slow down my website?
Not much.
An embedded Google Calendar is lightweight.
If you have a lot of other plugins or heavy images, it’s smart to check your page speed with a tool like PageSpeed Insights.
Q: What’s the easiest way to let people know about changes or new events?
A: Use Google Calendar notifications (people can subscribe to your public calendar).
Need Help Adding Google Calendar to Your Website?
Two ways to get support from WordPress experts:
1.Contact me directly
Want your Google Calendar integrated seamlessly without the technical headaches? Visit my Contact page, and I’ll handle the entire setup process for you. I can help you:
Set up and connect your Google Calendar to your website
Customize the calendar display to match your brand
Ensure mobile-friendly and responsive design
Troubleshoot any technical issues
2. Join a community
For ongoing WordPress support, consider joining the Wealthy Affiliate Community. Thousands of entrepreneurs and business owners share their WordPress knowledge and offer guidance on calendar integrations, plugins, and website growth strategies.